For the past few months I have been experimenting with creating my own lotions, body butters, lip chaps and other moisturizers. To be honest, there have been so many batches of lovely smelling lotions in my kitchen recently that I couldn't possibly use all of it! Thankfully family and friends have been helping me try out the various versions I came up with and offering feedback. This one was one of the favorites as it isn't very greasy, helps to ease dry skin, and leaves skin silky soft. I also like it because I don't have to constantly re-apply to get the benefits, a single application can last me quite a long time even in a dry office building or out in the Texas sun. One thing to know about this lotion is that it set ups to be a thicker, creamy lotion than you may be used to. This means that you will end up taking a small amount out of the jar and using on quite a large area of skin rather than use a pump to dispense a large amount into your hand as it is not a thin liquid like you may be used to when you think of lotion.
NOTE: A single pound of these 'butters' will likely last you nearly a year's worth of lotion for one person or several months for a family so there is no need to over purchase.
INGREDIENTS:
1/4 C Cocoa Butter
1/4 C Olive Oil
1/4 C Coconut Oil
1/4 C Shea Butter
1/2 C pure aloe vera gel
1 Tbsp grated beeswax or beeswax pellets
1 tsp Vitamin E oil
Essential Oils of Choice (Optional)
EQUIPMENT:
Small saucepan
Measuring cups/spoons
Knife
Spoon
Electric Mixer
Container to hold your lotion (about 1.5-2 C of lotion comes from this recipe)
PROCEDURE:
1. Measure out your ingredients. You will likely need a knife to cut the cocoa butter.
2. Place the shea butter, cocoa butter, coconut oil, and olive oil in a small saucepan on LOW heat. You do not want the mixture to boil or smoke... it needs to be kept very low. The ingredients will melt fairly quickly even on low heat so watch carefully.
3. Once everything has melted, mix in the vitamin e oil and aloe vera gel and remove from heat.
4. Add in any essential oils you may want for added scent or aromatherapy needs. I prefer peppermint as it smells delightful with the cocoa butter but I have used sweet orange (think one of those chocolate oranges in scent), lavender (for calming, evening use especially), and a unique mixture of citrus (lemon and lime) and frankincense for one individual. You can be as creative as you want or stick with the plain version which smells slightly of chocolate from the cocoa butter.
5. Allow the lotion to cool until it has just begun to set up. You can just leave it on the counter for a few hours and go about your day or be like me and toss it into the freezer for 10-15 minutes to speed up the process.
6. Once it has begun to set up you will use the electric mixer to beat the lotion into the creamy consistency we are looking for. This adds air to the mixture so that it isn't quite as dense.
NOTE: If you let the mixture get to hard/cool then it is easy to apply a little heat and mix with a spoon for a minute or two to get back to the correct consistency.
7. Add it to a jar and allow to finish setting up for half an hour or so.
Curious where I get my ingredients? I get my ingredients all over the metroplex, on Amazon and through Young Living as a distributor. Don't want to search out stores to pick them up? I'll make it easy! You can place an order through me for any oils you may need and there are quick links for the non-perishable ingredients and tools on Amazon should you wish to order online on this page... just click on the ingredient.

This blog has moved! Head to: reallifewithheather.com today
Friday, July 31, 2015
Thursday, July 30, 2015
What Happens When I Reintroduce Grains
I am currently reading Wheat Belly: Total Health by William Davis. I'll post a review once I am finished reading the book but so far I can say that this book is jam-packed with more information than I will be able to fully absorb in a single read so if you are looking for a comprehensive text on the history of grains and how they interact with the human body this may be your book. Since I was spending so much time delving into the complexities of wheat as a food stuff I was wondering how much my avoidance of wheat was truly the reason I was feeling so much better as the book states... so I posed an experiment. I re-introduced grains for one week, 7 full days. I made sure that I was keeping as many other factors the same as possible within my diet but I added in bread and other grain products. For instance, when I ate a hamburger I ate the bun instead of my usual bun-less burger. I didn't go crazy and change my diet 100% back to the Standard American Diet, just a few servings of grains per day. All in all the week went exactly as I expected... here's the breakdown:
Monday: I reintroduced wheat by choosing a small portion of mushroom stuffed ravioli at lunch but kept everything else the same in my diet. I felt more tired that evening and had a touch of the insomnia I had previously kicked while being grain free.
Tuesday: I had a biscuit at breakfast and a slice of pizza at a work gathering at lunch but dinner stayed the same as usual and was nearly carb free as I was feeling pretty poorly. My stomach began acting up and I started to bloat.
Wednesday: My POTS started acting up with tachycardia and nausea. I also had to take some headache medication and was exhausted by the time I came home from dinner. I did not have grains with lunch or dinner, only at breakfast.
Thursday: Still feeling poorly in general, my stomach was still acting up- IBS was back in full swing- and I needed to lie down at work for a few minutes as I had a tachycardia attack with nausea and vertigo. I didn't make it to my after work activity (choir) as that was out of the question... I simply went home to lay down on the couch.
Friday: I had been noticing that it was more difficult to think as clearly this week but now it was quite pronounced. I could only read a few pages at a time without a break today as I typically had to re-read sections to fully comprehend the complex subject matter of my grad class. I fell asleep early tonight.
Saturday: Today was a bust... I woke up with a migraine which meant that I didn't move or do much of anything until well after lunchtime and then was exhausted and still in pain/nauseous for most of the day- even with 3 different migraine/pain medications. For this reason I ended up ordering a pizza and calling it a wash- I was already on the eating grains bandwagon for two more days and it was easy to be honest. I have been craving sugar like it's nobody's business since about Wednesday as well I realized.
Sunday: Since I fell asleep at nearly 4am due to the copious amounts of sleep I got on Saturday and the physical and mental exhaustion that has been the week in general I missed church in the morning. I was still sluggish for most of the day and trying to do homework was ridiculous in the evening. I was looking forward to stopping the grains again on Monday but not looking forward to the possible withdrawal symptoms triggered by coming back off the grains.
Symptoms that came back on grains:
If you are interested in purchasing Wheat Belly: Total Health I am including a link below. Your local library likely has several books on Paleo and grain-free living as well. Happy reading!
Monday: I reintroduced wheat by choosing a small portion of mushroom stuffed ravioli at lunch but kept everything else the same in my diet. I felt more tired that evening and had a touch of the insomnia I had previously kicked while being grain free.
Tuesday: I had a biscuit at breakfast and a slice of pizza at a work gathering at lunch but dinner stayed the same as usual and was nearly carb free as I was feeling pretty poorly. My stomach began acting up and I started to bloat.
Wednesday: My POTS started acting up with tachycardia and nausea. I also had to take some headache medication and was exhausted by the time I came home from dinner. I did not have grains with lunch or dinner, only at breakfast.
Thursday: Still feeling poorly in general, my stomach was still acting up- IBS was back in full swing- and I needed to lie down at work for a few minutes as I had a tachycardia attack with nausea and vertigo. I didn't make it to my after work activity (choir) as that was out of the question... I simply went home to lay down on the couch.
Friday: I had been noticing that it was more difficult to think as clearly this week but now it was quite pronounced. I could only read a few pages at a time without a break today as I typically had to re-read sections to fully comprehend the complex subject matter of my grad class. I fell asleep early tonight.
Saturday: Today was a bust... I woke up with a migraine which meant that I didn't move or do much of anything until well after lunchtime and then was exhausted and still in pain/nauseous for most of the day- even with 3 different migraine/pain medications. For this reason I ended up ordering a pizza and calling it a wash- I was already on the eating grains bandwagon for two more days and it was easy to be honest. I have been craving sugar like it's nobody's business since about Wednesday as well I realized.
Sunday: Since I fell asleep at nearly 4am due to the copious amounts of sleep I got on Saturday and the physical and mental exhaustion that has been the week in general I missed church in the morning. I was still sluggish for most of the day and trying to do homework was ridiculous in the evening. I was looking forward to stopping the grains again on Monday but not looking forward to the possible withdrawal symptoms triggered by coming back off the grains.
Symptoms that came back on grains:
- More tachycardia/POTS incidents
- Brain fog and concentration issues were very apparent. There was even an increase in the frequency of speech issues (not being able to find the word I want, stumbling over my words, sentence articulation issues).
- IBS symptoms including bloating and bowel issues in general (don't really want to get into this in detail, let's just leave it as 'not pretty')
- I bloated more than an inch on my waist and several pounds within the first three days. I had only had about 3-4 servings of grains total at that point... it got worse as the week progressed.
- Nausea
- Fatigue
- Low grade headaches were present on several days and several days where I needed to take tension headache medication.
- Worst migraine I have had in nearly 6 months
- Allergies worsened
- Immune system suppression as I ended up with a slight cold including a slight fever and ear ache
- My joint pain and pain in general increased
- Increase cravings for wheat containing foods and sugar in general
- Acne breakouts
If you are interested in purchasing Wheat Belly: Total Health I am including a link below. Your local library likely has several books on Paleo and grain-free living as well. Happy reading!
Wednesday, July 29, 2015
Kitchen Gadget: Ice Cube Trays

Want to know what one of my most useful kitchen tools is? The one that saves me the most money out of everything in my kitchen? No, I don't have one of those nifty food saver machines (though they look pretty cool). it is so much simpler and CHEAPER than that. Ice trays... simple, $1 for 2 at the dollar store, ice trays. I use them to freeze up bone broth, sweet potato and pumpkin purees, ketchup, BBQ sauce, and even fresh herbs (in olive oil). I can't tell you how much time I save in the morning when I can just grab some pre-chopped and frozen fruit, a cube or two of pumpkin puree, a handful of greens and a cup of liquid to make a smoothie in less than a minute. No measuring, no mess, no spoiled food... easy, quick and I save money to boot! Or the evening I come home exhausted and just want a quick burger with some yummy homemade ketchup or a bowl of soup but don't feel like spending 10 minutes making that ketchup or an hour or more making soup... nuke 1-2 cubes of ketchup while the burger is cooking and dinner's done or toss a handful of ready-made stock cubes with some chopped veg in a small pot while I do my evening chores (think laundry... so much laundry... why is there ALWAYS laundry!?!) and I'm done. I'm not a big fan of cooking for one and even less of a fan of cooking for more than 20 minutes on a weeknight... is anyone?


If you wanted to store herbs you just chop or mince them, put them in the tray and fill the remaining space with olive oil. How would I use these cubes of oil and fresh herbs you ask? Just toss it in a hot pan and saute away... fast and easy way to start off your stir fry or pan seared Tilapia. Best part? Those fresh herbs you worked so hard to cultivate don't wilt away unused and wasted! I don't have any fresh herbs right now so unfortunately I can't show photos of how to do this... yet. I will try and come back to add photos the next time I do.
I measured my ice tray compartments by taking a cup of water and filling the compartments of tray one by one until the water was gone in order to measure the volume of each cube quickly and efficiently. Now I know exactly how many cubes I need when a recipe calls for something I have frozen away for later use and don't have to guess.
Tuesday, July 28, 2015
Exfoliation and Facial Care
Your facial skin is very sensitive and as such it is important to take good care of it. Most cleansers and exfoliation creams have harsh chemicals in them that can cause more harm than good, especially to sensitive skin. For this reason I have slowly moved to an all natural skin care regime myself. The best part? Well, other than the fact that my skin isn't being exposed to chemicals I mean... I can make everything from items already in my pantry which means its super inexpensive and I don't have any wasted 'products' expiring before I use them. How much does one teaspoon of baking soda cost? Less than a penny typically. A healthy pinch of coconut oil? Usually, less than $0.07... and a single teaspoon of apple cider vinegar costs less than 3 cents. So It costs me AT MOST $0.10/day or $3.00 a month to clean, exfoliate, tone, and remove make-up off of my face... and I don't need to do it every day! How much does your skincare routine cost you each month? A brand name pack of make-up removing cloths will run you $4.50... so that cost can add up very quickly.
Make-up Remover:
Coconut oil is amazing! You will see it in most of my recipes used for moisturizing just to begin with (and not even touching on cooking!)... from lotions to pre-shave cream to make-up remover this is a very versatile substance. Simply rub a bit on your eye lids in a circular motion and then wipe it off with a soft cloth to remove makeup, including mascara!

Exfoliator #1:
This is a simple mixture of baking soda and water and is ideal for occasional use rather than everyday use. Mix together 1 tsp baking soda, 1 drop lavender (optional) and 1 tsp water. Put mixture on a cleansing pad and rub in gentle circles on your face. Rinse with warm water, pat dry and follow up with toner.


Exfoliator #2:
While sugar is not a good choice for your daily nutrition it is a good option to exfoliate your skin. Simply mix sugar and oil in a 1:1 ratio and rub gently on your face. Let it sit for a few minutes before rinsing with warm water and pat your face dry. I have seen this type of recipe used in spas with some added oils as part of a massage or other treatment... you can even purchase sugar scrubs at beauty supply stores. Without fail they are far more expensive than they should be. It will cost you less than $1.00 to mix up a fairly generous amount of this concoction which leaves your skin smooth and glowing. Again, exfoliation isn't something you should do every day as once or twice a week should be plenty.
Toner:
Another super simple beauty item directly out of your pantry... apple cider vinegar. A mix of 4 parts water to 1 part ACV makes an effective toner. Simply pat a bit on after you exfoliate and this pantry staple is now a cheap but effective skin toner. It does, of course, smell like vinegar but the smell dissipates very quickly so should not be a deterrent.

Cleanser:
Cleansing your face is something you do every day most likely so it needs to fairly gentle on your skin. Personally, I typically just cleanse with warm water most days but there are some days that I want something a bit more substantial... like if I get a breakout of acne. Usually acne isn't a problem for me anymore unless I fall off the wagon so to speak but there are indeed times where I eat something I shouldn't or don't realize that there is an ingredient that I shouldn't eat in a dish while I am out to eat. These are the times I rely on my cleanser and some do some extra TLC on my skin. Like all the other recipes on the list here I have the ingredients for my cleanser in my kitchen pantry. Simply mix 2 tsp of coconut oil with 1 tsp of baking soda and you have an effective but gentle cleanser. Rub in gentle circles on your face, wait a few minutes then rinse with warm water and pat dry. Follow up with toner for a complete skincare routine. One note about coconut oil: while it should be liquid at room temperature sometimes your room temperature is a bit cooler so it will be solid. If this is the case it is a little more difficult to mix together. Simply toss it in the microwave for 10 seconds and it is very easy to mix!


I will be discussing lotions and body butter in about a week so check back then for some all-natural but still simple recipes. What other diy all natural recipes would you like to show up in the blog? Until next time, have a healthful day!
Curious where I get my ingredients? I get my ingredients all over the metroplex, on Amazon and through Young Living as a distributor. Don't want to search out stores to pick them up? I'll make it easy! You can place an order through me for any oils you may need and here are some quick links for the rest of the ingredients on Amazon should you wish to order online:
Make-up Remover:
Coconut oil is amazing! You will see it in most of my recipes used for moisturizing just to begin with (and not even touching on cooking!)... from lotions to pre-shave cream to make-up remover this is a very versatile substance. Simply rub a bit on your eye lids in a circular motion and then wipe it off with a soft cloth to remove makeup, including mascara!

Exfoliator #1:
This is a simple mixture of baking soda and water and is ideal for occasional use rather than everyday use. Mix together 1 tsp baking soda, 1 drop lavender (optional) and 1 tsp water. Put mixture on a cleansing pad and rub in gentle circles on your face. Rinse with warm water, pat dry and follow up with toner.


While sugar is not a good choice for your daily nutrition it is a good option to exfoliate your skin. Simply mix sugar and oil in a 1:1 ratio and rub gently on your face. Let it sit for a few minutes before rinsing with warm water and pat your face dry. I have seen this type of recipe used in spas with some added oils as part of a massage or other treatment... you can even purchase sugar scrubs at beauty supply stores. Without fail they are far more expensive than they should be. It will cost you less than $1.00 to mix up a fairly generous amount of this concoction which leaves your skin smooth and glowing. Again, exfoliation isn't something you should do every day as once or twice a week should be plenty.
Toner:
Another super simple beauty item directly out of your pantry... apple cider vinegar. A mix of 4 parts water to 1 part ACV makes an effective toner. Simply pat a bit on after you exfoliate and this pantry staple is now a cheap but effective skin toner. It does, of course, smell like vinegar but the smell dissipates very quickly so should not be a deterrent.

Cleanser:
Cleansing your face is something you do every day most likely so it needs to fairly gentle on your skin. Personally, I typically just cleanse with warm water most days but there are some days that I want something a bit more substantial... like if I get a breakout of acne. Usually acne isn't a problem for me anymore unless I fall off the wagon so to speak but there are indeed times where I eat something I shouldn't or don't realize that there is an ingredient that I shouldn't eat in a dish while I am out to eat. These are the times I rely on my cleanser and some do some extra TLC on my skin. Like all the other recipes on the list here I have the ingredients for my cleanser in my kitchen pantry. Simply mix 2 tsp of coconut oil with 1 tsp of baking soda and you have an effective but gentle cleanser. Rub in gentle circles on your face, wait a few minutes then rinse with warm water and pat dry. Follow up with toner for a complete skincare routine. One note about coconut oil: while it should be liquid at room temperature sometimes your room temperature is a bit cooler so it will be solid. If this is the case it is a little more difficult to mix together. Simply toss it in the microwave for 10 seconds and it is very easy to mix!


I will be discussing lotions and body butter in about a week so check back then for some all-natural but still simple recipes. What other diy all natural recipes would you like to show up in the blog? Until next time, have a healthful day!
Curious where I get my ingredients? I get my ingredients all over the metroplex, on Amazon and through Young Living as a distributor. Don't want to search out stores to pick them up? I'll make it easy! You can place an order through me for any oils you may need and here are some quick links for the rest of the ingredients on Amazon should you wish to order online:
Monday, July 27, 2015
Easy Cream Cheese... and Whey
Are you a bit of a cream cheese fan? Me too! While this recipe doesn't actually produce the same cream cheese you would purchase in a little silver container in the dairy aisle it comes pretty close. The cheese produced here is produced overnight and takes very little effort but is closer to a fromage blanc, meaning it is a bit more tangy than what you would be used to picking up on your way home from work... but it is great for spreads and dips! I began making this simple cheese because I wanted the by-product: whey. Whey is very useful for lacto-fermenting condiments... which I do A LOT of. Why ferment foods you ask? Well, as Wellness Mama says, "Homemade salsa only lasts a few days in the fridge- Fermented homemade salsa lasts months! The same goes for sauerkraut, pickles, beets and other garden foods. Lacto-fermentation allows you to store these foods for longer periods of time without losing the nutrients like you would with traditional canning." I couldn't have said it better myself! I got tired of having to remake my condiments each week and started looking into ways to prolong the shelf-life and therefore use my time more wisely. This seemed like an easy way to make that happen as a single container of yogurt produced not only a creamy cheese that my ex-husband enjoyed as an onion dip (and others have used with fruit and jams to be included with breakfast and dessert!) but enough whey to last me the whole month for all of my condiments from dressings to ketchup to salsa and bbq sauce. It freed up a lot of my time but allowed me to eat healthy as well.


Curious where I get my ingredients? I get my ingredients all over the metroplex, on Amazon and through Young Living as a distributor. Don't want to search out stores to pick them up? I'll make it easy! You can place an order through me for any oils you may need and here are some quick links for the non-perishable ingredients and tools on Amazon should you wish to order online:
So... here's the how-to:
INGREDIENTS:
16-32 oz Full Fat Unflavored Yogurt (depending on how much whey/cheese you would like... you can get about 1/3-1/2 of the amount you started with as cheese in the end)
TOOLS:
Cheesecloth
Dish
2 Rubber Bands or 1 Wire Clothes Hanger
PROCEDURE:
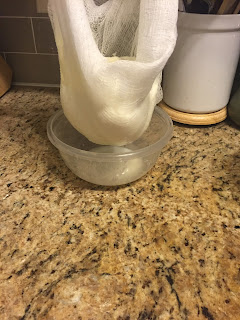
1. Fold cheesecloth over to make 6-8 layers.
NOTE: If you don't have/can't find cheesecloth then use a clean, very thin towel. I don't recommend this method as I have always used the cheesecloth but I have heard that it works just fine. The cloth must be very thin though or it will absorb too much of the whey.

2. Tie one side of the cheesecloth to the hanger and place the hanger on a cabinet handle or ledge.
3. Place a bowl beneath where the cheesecloth will be hanging and drape the, now hanging, cheesecloth in the bowl.

4. Put the yogurt into the cheesecloth.

5. Tie the other side of the cheesecloth to the hanger.

6. Insure that the bowl is directly beneath the hanging cheesecloth.
7. Check back in the morning... you should have cheese in the cloth and whey in the bowl.
NOTE: If you do not want to use a hanger you can place the cheesecloth, centered, over the bowl. Then place the yogurt in the cheesecloth. Finally, use 1 rubber band to close the cheesecloth and the other to attach it to the cabinet door.


8. Place the whey in an airtight container and place in the fridge. It will last at least a month so long as you made to sure to strain out all of the yogurt. The whey will be a slightly yellow tinted translucent liquid.

9. Place the cheese in a separate airtight container and place in the fridge. The cheese will last about a week in the fridge.

Curious where I get my ingredients? I get my ingredients all over the metroplex, on Amazon and through Young Living as a distributor. Don't want to search out stores to pick them up? I'll make it easy! You can place an order through me for any oils you may need and here are some quick links for the non-perishable ingredients and tools on Amazon should you wish to order online:
Sunday, July 26, 2015
Creamy Italian Dressing
I love ranch dressing... we established that already... but the longer I have been Paleo the less I have used the creamy dressings and other condiments in my day to day life. I still love salad dressings though and a quick vinaigrette is always tasty. This recipe is easily changed to highlight different flavors by exchanging vinegars, oils or herbs but this is a basic Italian inspired version. It isn't completely necessary to use the immersion blender but I really enjoy the slightly emulsified version that results when an immersion blender is used instead of just shaking it up. The longer the dressing sits the stronger the flavors will get. This means that if you don't really like garlic or another spice lessen it at the beginning and don't over-do spices as you experiment with new flavors.
INGREDIENTS:
1 C vinegar (apple cider, wine, rice, etc... I prefer white as it is closer to a classic bottled Italian dressing as it is a fairly mild vinegar)
1.5 C olive oil or other oil (I use EVOO- extra virgin olive oil)
3 Tbsp water
1 Tbsp garlic powder
1 Tbsp onion powder
1/2 Tbsp honey
1 Tbsp dried oregano
1 tsp ground black pepper
1/2 tsp dried thyme
1 tsp dried basil
1 Tbsp dried parsley
1 Tbsp salt
PROCEDURE:
1. Put all ingredients in a mixing bowl.

2. Use immersion/stick blender to combine the ingredients. Mix for about a minute.

3. Pour into airtight containers.


*You might have to shake the bottle before using it again to recombine as it can settle.
What kind of vinaigrette dressings do you use in your home?
Saturday, July 25, 2015
Ginger Tea
I had a migraine on Saturday (it happens fairly frequently for me unfortunately) which means that I was not feeling well at all. For me, a migraine often comes with nausea, pain, vertigo, and sensitivity to light and sound. Since I am attempting to back off of medications and look for more natural alternatives I decided to brew up a batch of tea for the nausea once the pain began to recede (I haven't found anything non-medication to help with the pain yet so there was some pain medication involved in that bit). Since a natural anti-nausea aide can be useful for others as well I decided to share a recipe for ginger tea today. Ginger root can be found with other root vegetables in your local market.
INGREDIENTS:
1 Tbsp Fresh Grated Ginger (Peeled)
2 Tbsp Honey
2 C Filtered Water
Optional:
Fresh Mint, Cinnamon Stick(s), or Lemon/Citrus Juice
PROCEDURE:
1. Put the kettle on to boil with at least 2 C of filtered water.
2. Peel a small piece of fresh ginger with a peeler, the back of a spoon or a small paring knife.
3. Grate ginger. You will need 1 Tbsp of ginger for this recipe.


NOTE: Do not sub ground or dried ginger in this recipe
4. Place ginger in large cup or teapot. I have soup cups that I use for my ginger tea personally as I like to drink it throughout the day... even after it is cold. You can use a tea infuser if you would like if you do not want bits of ginger in the bottom of the cup once it has finished brewing.
NOTE: If you are using the mint or cinnamon stick(s) place these in as well.


5. Pour boiling water over the ginger.

6. Brew for about 10 minutes.
7. Add honey and stir well. You can sub stevia or simply leave out the honey if you so choose but if you have a cold and are coughing the honey will help. Citrus will also help cut through mucus. For that reason you may want to add lemon juice to your tea if you have a cold.

INGREDIENTS:
1 Tbsp Fresh Grated Ginger (Peeled)
2 Tbsp Honey
2 C Filtered Water
Optional:
Fresh Mint, Cinnamon Stick(s), or Lemon/Citrus Juice
PROCEDURE:
1. Put the kettle on to boil with at least 2 C of filtered water.
2. Peel a small piece of fresh ginger with a peeler, the back of a spoon or a small paring knife.
3. Grate ginger. You will need 1 Tbsp of ginger for this recipe.


4. Place ginger in large cup or teapot. I have soup cups that I use for my ginger tea personally as I like to drink it throughout the day... even after it is cold. You can use a tea infuser if you would like if you do not want bits of ginger in the bottom of the cup once it has finished brewing.
NOTE: If you are using the mint or cinnamon stick(s) place these in as well.


5. Pour boiling water over the ginger.

6. Brew for about 10 minutes.
7. Add honey and stir well. You can sub stevia or simply leave out the honey if you so choose but if you have a cold and are coughing the honey will help. Citrus will also help cut through mucus. For that reason you may want to add lemon juice to your tea if you have a cold.

Buffalo Ranch Dressing

There are some things I miss more than others with this new way of eating... one of those things is a good ranch dressing on a spinach and mixed greens salad. I tried for months to find a recipe I enjoyed but never found one that was exactly what I was looking for. Don't get me wrong, a quick google search of "Paleo Ranch dressing" will net you several good recipes for ranch but I enjoy quite a bit of dill and a nice bit of garlic in my ranch dressings and none quite hit the spot. This one started out as a combination of several of those googled recipes actually but my ex-husband really likes spicy food and I was working to not only feed myself healthy food but find things that he enjoyed eating as well... so this buffalo ranch recipe was born. It was just spicy enough that he didn't care that it was 'healthy' and made his salads a bit more palatable so we were both eating better. Now its just me around the house so I don't make it as often as I used to but I have taken this dressing to pot lucks where no one but myself was eating Paleo and everyone had rave reviews.
INGREDIENTS:
1 C Paleo Mayo (recipe here)
1 C Coconut Milk
1/3-1/2 C Buffalo Sauce (with no added sugar or unpronounceable ingredients)
1.5 Tbsp Garlic Powder
1.5 Tbsp Onion Powder
2 Tbsp Dill Weed
1 tsp Black Pepper
1/2-1 tsp Sea Salt (to taste)
1 tsp Paprika
PROCEDURE:
1. Arrange your ingredients and tools. I was cooking several things the day I made this recipe and apparently I decided that I should put extra spices in the picture... sorry about that!

2. Mix the mayo and coconut milk together in a bowl.

4. Slowly add in the Buffalo Sauce. I put this in last so that I can add more to taste as sometimes I am really craving something spicy. In that case I want more buffalo sauce so I taste as I go to make sure to get the perfect blend of what my taste buds are craving.
- NOTE: If you use canned coconut milk the dressing will turn out slightly sweet compared to the refrigerated kind. For this reason I typically use the refrigerated, unsweetened unflavored coconut milk. Today I was out so I turned to my pantry as I always have a jar or two in my pantry staples.
5. Pour the dressing into jars with airtight seals and refrigerate.

If you lacto-ferment it then it will last about 2 weeks in the fridge. If you do not then it tends to last about a week. It is also really easy to scale up or down this recipe depending on how much you wish to make.
What is your favorite Paleo-friendly dressing?
Friday, July 24, 2015
Paleo Mayo
Mayo is a pretty simple and quick condiment to make with the right tools. I have heard of people doing this by hand (ow...) as well as in food processors and with mixers. It seems the best way to make mayo is with an immersion blender and the second best way is with a food processor from what I have heard from others who have attempted this, and similar, recipes. Using an immersion, or stick, blender I have yet to have a batch fail to come out properly but the key is in the super slow drizzle of the oil.
Let's start with the basics of mayo making... you need eggs, an acid, an oil, a bit of salt, mustard, and possibly spices. Some people use egg whites with lemon juice and olive oil while others use apple cider vinegar with whole eggs and avocado oil... it all depends on what flavor you want to come out with in the end. If I want an aioli for instance I am going to use the lemon juice option and toss in some garlic at the end. On the other hand, if I want a good herb mayo spread I'm going to go with the apple cider vinegar and stick with a less flavorful mustard so that the flavors of the herbs I add really stand out.
Not only are there many different combinations to make mayo but it is a pretty useful thing to have. It can be used as a spread, in casseroles, in tuna (or egg) salad, in dips and other appetizers, in sauces, as the base of creamy salad dressings... you'll be surprised how many uses for mayo there are when you start looking! My basic mayo recipe is as follows:
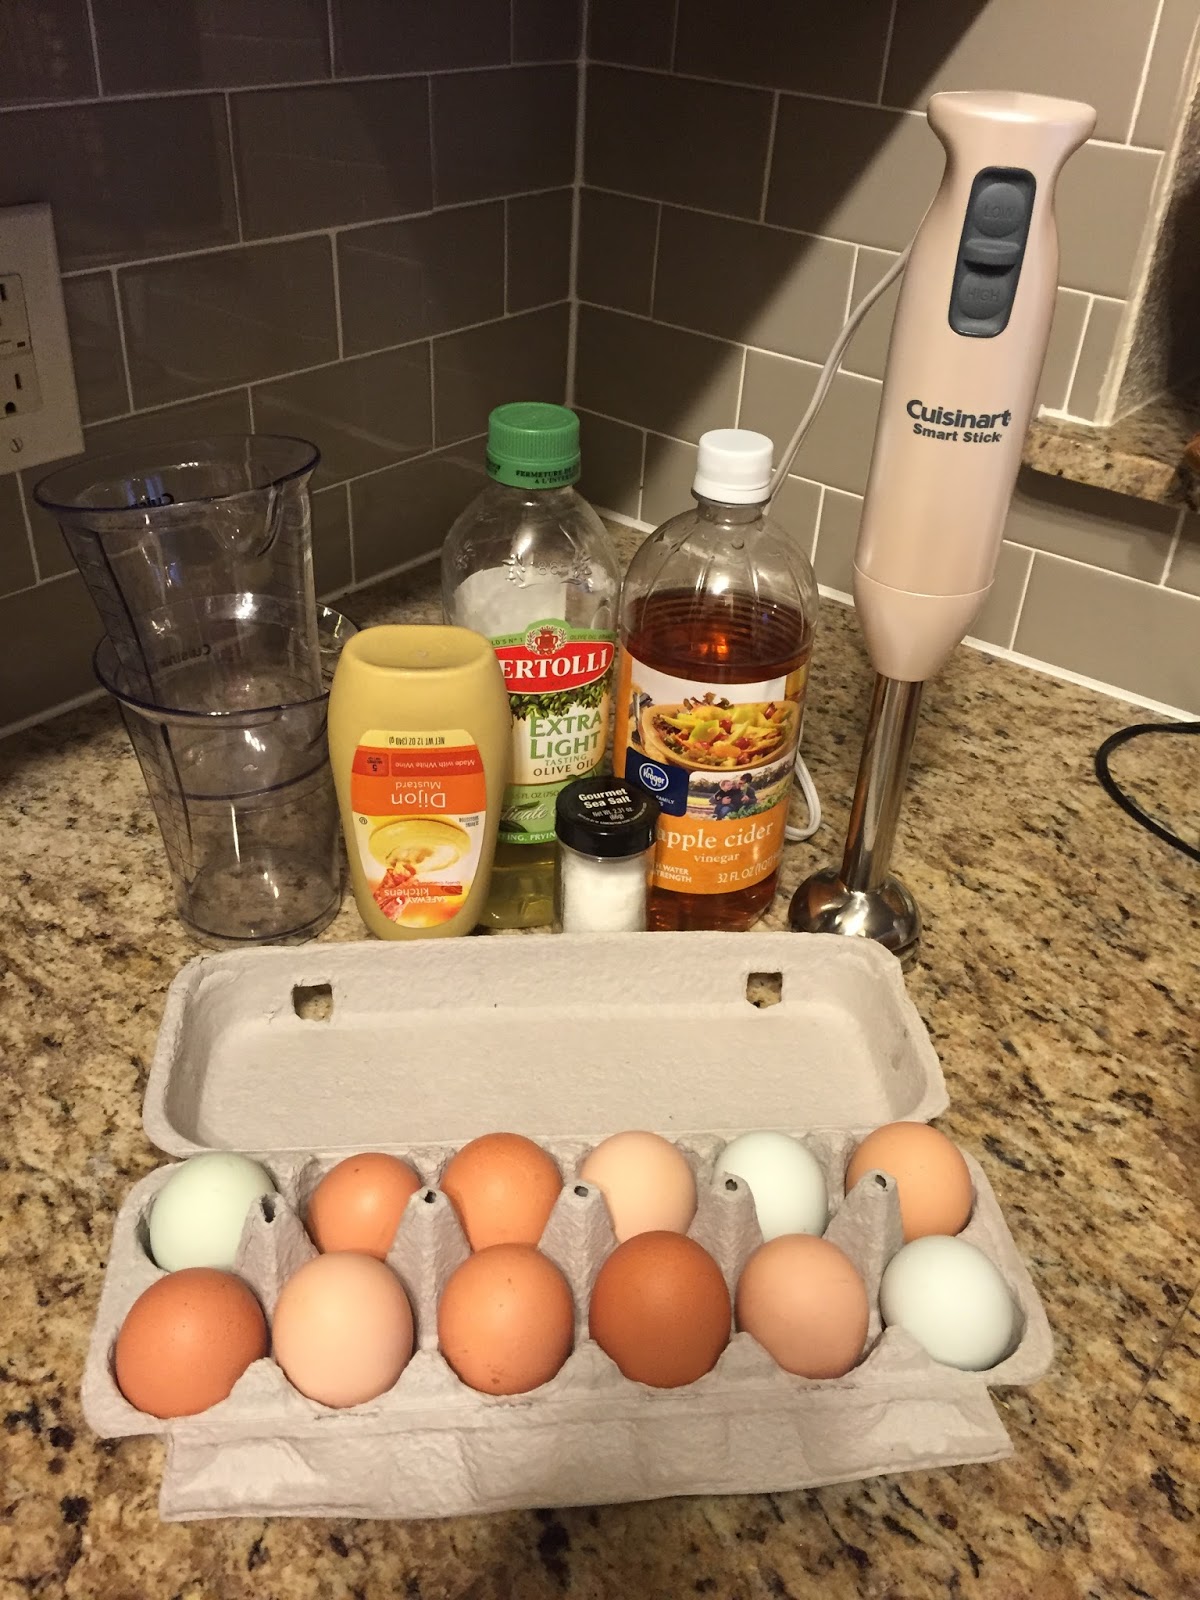
INGREDIENTS:
1 C Extra Light Tasting Olive Oil (not EVOO)
1 Large or E-Large Egg (the ones I used were local pasture raised and not large enough so I used two eggs and did 1.5x all the other ingredients to compensate... I use WHOLE eggs for my recipe, not just the whites.)
1 Tbsp Apple Cider Vinegar
1 Tbsp Dijon Mustard (I prefer Dusseldorf mustard but they didn't have any at the market... sad day...)
Salt to taste
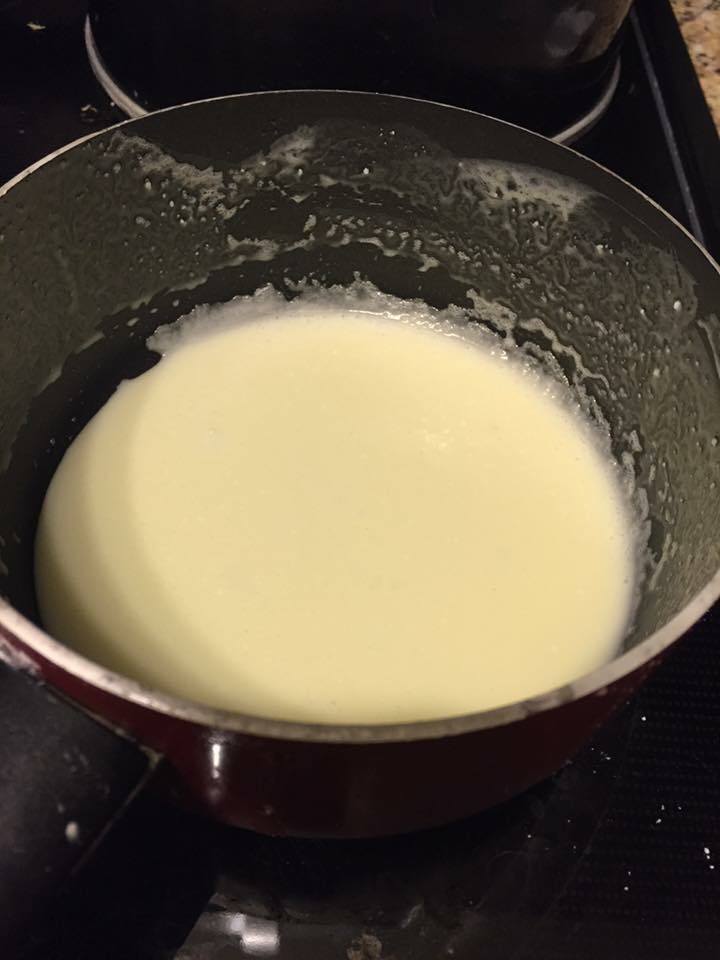
PROCEDURE:
1. Mix everything except the oil together in a bowl.
*It is best to use eggs that are at room temperature as they tend to emulsify better I have found.


2. Use the immersion/stick blender to whip up the mixture as you SLOWLY drizzle in the olive oil. The key here is slow and steady.


3. Put the mayo into an airtight container and refrigerate.

If you lacto-ferment it then it will last about 2 weeks in the fridge. If you do not then it tends to last about a week. It is also really easy to scale up or down this recipe depending on how much you wish to make. If you don't know how to lacto-ferment your condiments it is a really simple process that I will cover in a few days... so come back and check it out!
What do you use mayo in? What additional spices do you add to it to give it that extra kick of awesome (I've heard of a spicy mayo that sound pretty amazing)?
Let's start with the basics of mayo making... you need eggs, an acid, an oil, a bit of salt, mustard, and possibly spices. Some people use egg whites with lemon juice and olive oil while others use apple cider vinegar with whole eggs and avocado oil... it all depends on what flavor you want to come out with in the end. If I want an aioli for instance I am going to use the lemon juice option and toss in some garlic at the end. On the other hand, if I want a good herb mayo spread I'm going to go with the apple cider vinegar and stick with a less flavorful mustard so that the flavors of the herbs I add really stand out.
Not only are there many different combinations to make mayo but it is a pretty useful thing to have. It can be used as a spread, in casseroles, in tuna (or egg) salad, in dips and other appetizers, in sauces, as the base of creamy salad dressings... you'll be surprised how many uses for mayo there are when you start looking! My basic mayo recipe is as follows:
INGREDIENTS:
1 C Extra Light Tasting Olive Oil (not EVOO)
1 Large or E-Large Egg (the ones I used were local pasture raised and not large enough so I used two eggs and did 1.5x all the other ingredients to compensate... I use WHOLE eggs for my recipe, not just the whites.)
1 Tbsp Apple Cider Vinegar
1 Tbsp Dijon Mustard (I prefer Dusseldorf mustard but they didn't have any at the market... sad day...)
Salt to taste
PROCEDURE:
1. Mix everything except the oil together in a bowl.
*It is best to use eggs that are at room temperature as they tend to emulsify better I have found.

2. Use the immersion/stick blender to whip up the mixture as you SLOWLY drizzle in the olive oil. The key here is slow and steady.


3. Put the mayo into an airtight container and refrigerate.

If you lacto-ferment it then it will last about 2 weeks in the fridge. If you do not then it tends to last about a week. It is also really easy to scale up or down this recipe depending on how much you wish to make. If you don't know how to lacto-ferment your condiments it is a really simple process that I will cover in a few days... so come back and check it out!
What do you use mayo in? What additional spices do you add to it to give it that extra kick of awesome (I've heard of a spicy mayo that sound pretty amazing)?
Thursday, July 23, 2015
Homemade Deodorant
I am allergic to aluminum... this means traditional, store bought, deodorants are pretty much off the table for me. Now-a-days this doesn't bother me as I've seen quite a bit of research to show that our traditional deodorants with antiperspirant properties are bad for you anyways but for years it was the bane of my monthly shopping expedition. Until you have tried more store-bought options than you can remember you just don't understand the struggle to find a good aluminum free deodorant. Ones I remember off the top of my head:

The ingredients were pretty much things I already had on hand in my house (except corn starch but that was a quick fix at the grocery store and now I have more than enough for my suburban homesteading/diy adventures to come for quite a while): cornstarch, baking soda, coconut oil, beeswax, and essential oils (lemon, frankincense, and lavender).
 I simply followed the step by step directions to combine all the ingredients with low heat then add in the essential oils once well combined. It was a quick recipe to follow and ended up giving me two beautiful sticks of deodorant.
 One note: it is a little difficult to get them to turn properly with my containers at first but I just used a towel to get a firm grip and kept turning until it began to move and now there are no issues.
I've been using the deodorant for about two weeks now and have had no problems with smelling sweaty and gross in the day to day activities, even in a Texas summer!
Now for the problems...
UPDATE: I have tried about a million combinations at this point it feels like. I ended up halving the recipe but upping the beeswax and using Purification oil and Sweet Orange Oil plus a little bit of Lemon Oil to create the deodorant I am using now. I will post an official update post with the measurements in September.
Give it a try... it's easy, healthier than store bought options for your body, and quite inexpensive to boot!
I will be sharing my lotion/body butter recipe soon (wonderfully rich and silky... and only slightly more complicated than this recipe) so look for that in a few weeks! What would you guys like for me to try and make next? Comment below!
Curious where I get my ingredients? I get my ingredients all over the metroplex, on Amazon and through Young Living as a distributor. Don't want to search out stores to pick them up? I'll make it easy! You can place an order through me for any oils you may need and here are some quick links for the non-perishable ingredients and tools on Amazon should you wish to order online:
- Tom's- It failed... miserably... peaches and sweat is NOT a good combination people! This battle was about half my college career... it was not pretty.
- Adidas - They stopped making their aluminum free stick deodorant RIGHT after I realized it seemed to work pretty well of course. Still a college student in a small town with only Tom's peaches and sweat option I jumped on this while I had the chance.
- ClayDry- This seems to work fairly well and was recommended by the owner of the store I purchased my essential oils from while living in California but it smells similar to gin so was far from my favorite option.
- Lavolin 36 hour- This one works pretty amazing actually but I am distrustful of something that mysteriously lasts through my shower... just saying. I used the roll-on kind which is a little expensive but takes a few months to get through so this was my go to... until now!
- many many others...


I've been using the deodorant for about two weeks now and have had no problems with smelling sweaty and gross in the day to day activities, even in a Texas summer!
Now for the problems...
- I do NOT like the scent, it smells too masculine for me personally. Luckily when I make my next batch (I'm giving one bar away to a fellow aluminum-allergic POTSie friend so maybe in a month or so) I can change the scent. The scent is growing on me though so perhaps I'll just decrease the amounts of the oils to lighten up the scent. We shall see...
- The deodorant seems to melt as I am putting it on so the spread-able factor isn't quite right. I will fix this by adding a little more beeswax next time.
UPDATE: I have tried about a million combinations at this point it feels like. I ended up halving the recipe but upping the beeswax and using Purification oil and Sweet Orange Oil plus a little bit of Lemon Oil to create the deodorant I am using now. I will post an official update post with the measurements in September.
Give it a try... it's easy, healthier than store bought options for your body, and quite inexpensive to boot!
I will be sharing my lotion/body butter recipe soon (wonderfully rich and silky... and only slightly more complicated than this recipe) so look for that in a few weeks! What would you guys like for me to try and make next? Comment below!
Curious where I get my ingredients? I get my ingredients all over the metroplex, on Amazon and through Young Living as a distributor. Don't want to search out stores to pick them up? I'll make it easy! You can place an order through me for any oils you may need and here are some quick links for the non-perishable ingredients and tools on Amazon should you wish to order online:
Wednesday, July 22, 2015
Bone Broths
Bone broth is one of the easiest, most versatile and healthy recipes in the Paleo arsenal. It has a plethora of minerals and proteins that your body needs to run optimally and it tastes great too! As I have joint issues it is very important for me to get a lot of gelatin (and other joint supporting nutrition) into my diet so I LOVE using bone broth in my dishes. Personally, I use it as the base of many of my soups but it can also be used to de-glaze pans when making sauces, roast or saute vegetables, add flavor to a variety of main and side dishes or even drink it alone if you are so inclined. My recipes for bone broth is both super simple and works in the crock pot... which means that I do next to no work to get this fabulous broth! I don't often go through enough meat in any one month to have enough bones using only my leftover ones unfortunately but lucky for me there is an Asian market about 10 minutes away that stocks bones by the pound so I can make bone broth whenever I run out.
A tip for freezing: freeze it in ice trays or other shallow dishes for easy thawing later. I have found that ice trays are perfect as they are pre-measured and small enough to thaw single serving portions fast but I can always grab my bag of broth cubes and make stew quickly as well.
Here's the recipe:
INGREDIENTS:
2 lbs of bones (for this example I am using chicken bones acquired from the Asian market)
1-2 celery stalks, rough chopped
2-3 carrots, peeled and rough chopped
1 onions, rough chopped
1-2 Tbsp vinegar (I'm using apple cider vinegar in this example)
garlic cloves to taste
herbs to taste
filtered water
PROCEDURE:
1. Chop the veg and garlic and place in the bottom of the crock pot.
 I have an adverse reaction when I chop celery (instant migraine) so I purchase my celery pre-chopped but this isn't necessary nor necessarily optimal. I didn't have access to organic whole carrots today at the store so I used organic peeled baby carrots in about the same amount as 2-3 large carrots.

2. Add the chicken bones to the crock pot.

3. Fill the crock pot the rest of the way with water.

4. Add vinegar.

5. Place top on crock and turn the crock pot on low temperature.

6. Walk away for 24-36 hours.

7. Strain the broth through a fine mesh to remove veg and bones.

8. Cool the broth.

9. Remove layer of fat that solidifies on top of the, now gelled, broth if using non-grass fed/pastured animal bones.

10. Measure out the broth as desired. You can typically keep it in the fridge for about 5 days or freeze part of it if you won't be using it all right away.
 Your broth may vary in color from batch to batch depending on the bones you are using, the amount of remaining flesh, whether you roast your bones before using them for broth (good for beef bones especially), and the additional ingredients you add such as veg and herbs. Beef broth, pictured in cubes above, tends to be darker than chicken or fish for instance.
Curious where I get my ingredients? I get my ingredients all over the metroplex, on Amazon and through Young Living as a distributor. Don't want to search out stores to pick them up? I'll make it easy! You can place an order through me for any oils you may need and here are some quick links for the non-perishable ingredients and tools on Amazon should you wish to order online:
A tip for freezing: freeze it in ice trays or other shallow dishes for easy thawing later. I have found that ice trays are perfect as they are pre-measured and small enough to thaw single serving portions fast but I can always grab my bag of broth cubes and make stew quickly as well.
Here's the recipe:
INGREDIENTS:
2 lbs of bones (for this example I am using chicken bones acquired from the Asian market)
1-2 celery stalks, rough chopped
2-3 carrots, peeled and rough chopped
1 onions, rough chopped
1-2 Tbsp vinegar (I'm using apple cider vinegar in this example)
garlic cloves to taste
herbs to taste
filtered water
PROCEDURE:
1. Chop the veg and garlic and place in the bottom of the crock pot.


2. Add the chicken bones to the crock pot.

3. Fill the crock pot the rest of the way with water.

4. Add vinegar.

5. Place top on crock and turn the crock pot on low temperature.

6. Walk away for 24-36 hours.

7. Strain the broth through a fine mesh to remove veg and bones.

8. Cool the broth.

9. Remove layer of fat that solidifies on top of the, now gelled, broth if using non-grass fed/pastured animal bones.

10. Measure out the broth as desired. You can typically keep it in the fridge for about 5 days or freeze part of it if you won't be using it all right away.

Curious where I get my ingredients? I get my ingredients all over the metroplex, on Amazon and through Young Living as a distributor. Don't want to search out stores to pick them up? I'll make it easy! You can place an order through me for any oils you may need and here are some quick links for the non-perishable ingredients and tools on Amazon should you wish to order online:
Subscribe to:
Posts (Atom)
-
 When I went on my trip to Kentucky I realized that I needed a travel blanket and all the blankets I had currently wouldn't fit in my bag...
 -
 Salt is very important to my well-being due to the fact that I live with dysautonomia. We tend to use sodium to raise our blood pressure w...
 -
So a completely unexpected thing happened the other day... I got another diagnosis to add to the intake form. New diagnoses aren't somet...