It was difficult to find a good comparison online of the two meal management backpacks I had narrowed it down to- the Expedition 500 and the Isopack. Since this was the case I ended up ordering both the Expedition 500 and the Isopack to compare and decide which worked best for me. I decided on the Isopack so the Expedition will be returned. I'm hoping that this post will help someone else that is trying to decide which to purchase so that they won't have to order blindly. Due to the large number of photos I have to divide the comparison into several pieces, here is the second... the Expedition 500!
There is a chest clip to help distribute the weight. This is quite heavy even empty. I couldn't weigh it but I read that it was over 12 pounds empty and that seems pretty accurate. After it was full I definitely needed the weight distribution but it was just too heavy for me to carry easily so that was one of the negatives of this bag.
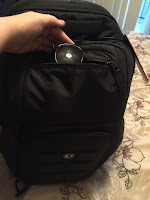
There are two front pockets. The very front one is meant for sunglasses and it fit mine quite well. The inside of the pocket is lined to avoid scratching your glasses. The only problem with this pocket is that once you fill the pocket behind it there is no longer room for the glasses if they aren't completely flat... which mine are not.
The pocket behind it has two smaller compartments as well as a clip and a mesh pouch. I was able to put my wallet in this compartment and my keys in the sunglasses pouch.
Next up is the laptop compartment. I was able to fit the same laptop, kindle and paper notebook in this laptop pouch as in the Isopack. This pocket is lined with the same fabric as the sunglasses pocket to avoid scratching. There is a pouch for a tablet in this backpack just as in the Isopack.
Here is the laptop as well as the kindle that was placed in the backpack.
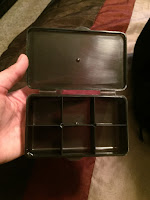
Inside the main compartment there are two small items that are not included with the Isopack: a drawstring bag and a vitamin/supplement storage container.
There are two side pockets that zip closed when not in use (or if you want to use them as another pocket) that convert into water and shaker bottle holders when unzipped. Zipping the pocket up helps to lock the bottle in place. I saw no issues with slippage of the bottles I placed in the pockets to test it out.
On to the inside of the main compartment... the front lays out for easy access to the inside pockets. There is one on the front of the bag, one on the top of the meal management section, a pocket on the back of the bag and two small pockets on the sides of the meal compartment. The side mesh compartments would fit a can of soda or small bottle of water. When you first get the bag you will see that the drawstring bag is located on top of the meal compartment. This is where I would continue to keep the bag. The last pocket, on the back, does not go all the way to the bottom of the bag but would be a good place to keep a laptop cord and wireless mouse.
I was able to put two smaller bags on the side of the meal management box but I did not use the mesh pouch. You should be able to put a pair of flats in the bag, one on each side in this area. A pair of minimalist running shoes would likely also fit here. A set of workout clothes fit behind the meal management area and left room to put items in the pouch above it or just atop the clothing. This is where I would put my toiletry bag.
On top of the meal management bag you can put a few other odds and ends but cannot overfill the area atop the meal management area as the front of the bag angles in when you close the bag.
I wasn't able to fit as much into this bag as I could in the Isopack. I was able to fit everything except the following and the ball:
from the same items that were in the carry-on set of items as in the other bag...


As you can see the rack simply snaps into the top of the meal area and drops down to extend.
The last pockets are located on the front of the meal area. The large icepack fits in the back pocket (it goes from the top all the way down) and utensils and napkins fit in the shorter top mesh pocket.
All in all this seems like a good all-in-one backpack if it wasn't so heavy to carry. It didn't fit quite as much as the Isopack but for most people that wouldn't be a problem since they don't need to carry around the medical items that I carry around. Without them I could fit everything I would need to carry in this bag quite easily... it carries everything I need for daily usage already just not quite everything I keep in my carry-on bag.


No comments:
Post a Comment