Showing posts with label Paleo. Show all posts

Wednesday, January 27, 2016

Myth: The Paleo Diet is All About the Meat... Not So!

I think there is a misconception that people who eat a Paleo/Primal type diet are basically carnivores and eat the occasional vegetable... the truth is that is a myth. The bulk of my diet is produce when you look at my plates (as I'm sure you have seen on Instagram for my lunches at least- @reallifewithheather).
This week's produce haul for instance had:
  • 3 bananas
  • 2 apples
  • 2 lbs strawberries
  • 11 oz blueberries
  • 6 large clementines
  • 5 tomatoes
  • 5 large heads of romaine lettuce
  • largest box of 50/50 mix (I want to say this was about a pound but I don't recall and already mixed it into salads for the week)
  • 1 bag of carrots
  • 1 bag of sugar snap peas
  • 1/2 lb mushrooms
  • 3 cans of green beans (pantry staple, fresh or frozen is better but they didn't have any at the market this week)
  • 2 large potatoes
  • 1 large sweet potato 
  • 1 large onion
  • 2 C salsa
And my weekend is eating out for Friday's dinner as well as Saturday's lunch and dinner and Sunday's lunch as I will be at a conference this weekend! If it wasn't there would be even MORE produce on this list. Thankfully the conference is nearby so I can eat breakfasts at home but since it is at a hotel I didn't think bringing my own food would be appropriate other than snacks (as I'm sure it will be mostly pastries and cookies on offer then and there is no way to make that work in the paleo framework.) Main meals I can usually find something on the menu that is a decent option at the hotel's restaurant or wherever we are going as a group for the meal.

I also keep some Spirulina and Chlorella in the pantry (algae) along with shirataki "noodles" and sometimes veggie chips of various types if I'm feeling in the mood for a crunchy snack and they are on sale. You'll often also see cucumbers, celery (I can't actually chop this as the scent gives me a migraine- random I know- so it's mostly just for bone broth/stock use), zucchini, squash, pumpkin (I have some puree in the pantry and some sweet potato puree frozen in the freezer), radishes, red potatoes, the occasional avocado (not my favorite, yet!), peppers, various lettuces/salad greens, spinach, an assortment of mushroom varieties, and more on my shopping list... it just depends on what I planned meal wise for the week and what looks great at the market.

Of course, we don't just eat produce... there is meat, nuts, oils/fats, and etc. This week I have:
  • 1 doz eggs for breakfast scrambles and omelets
  • 1.5 lb chicken for my chicken taco lunches
  • leftover chicken soup from my freezer... so bone broth and several ounces of chicken (but also more veggies!) for lunch on one day
  • 1 lb of ham for dinners on two to 3 days
  • 1/2 lb beef (ground) for a casserole
  • 1/4 lb sausage for the same casserole
  • 1/3 C olive oil for salad dressing
  • 1/3-1/2 C ghee for cooking fat and tortillas
  • 5-8 ounces of cheese (not Paleo but I choose to incorporate real cheese into my diet... this would be more a Primal mentality if we are getting picky on the issue)
  • almond and cassava flour for tortillas and pancakes (breakfast for dinner was AMAZING by the way... and some maple syrup and butter for those pancakes but I didn't measure out how much, best guess 1-2 Tbsp of grass-fed butter and 2-3 Tbsp of pure maple syrup since I ate leftovers for breakfast the next day so had two servings)
  • and potentially some of the nuts and seeds I plan on taking with me to the conference for snacking... with some fruit and veggies depending on if I am hungry or not.
If I was eating at home this weekend I would have about 1 lb more of meat most likely along with a lot more veggies. When eating out there is typically more a focus on the meat that the veggies as many options are offered that way (steak, chicken, pork chop, burger, etc. with x sides is how they are presented and veggies aren't plentiful on the plate as I'd prefer) but I try to get a good portion of veggies when available.

That's this week, things vary from week to week but when I plan meals I have one line for meat on each meal and 2-3 for veggies/fruit (and they aren't small 1/4-1/3 C portions for each veggie side either) so that should say something about how I eat. No two 'paleo'/'primal' eating plans are the same of course- I eat low carb and higher fat for instance so you will see a lot more fat rich foods on my meal plans and less starchy veggies but most of the people that I know buy their veggies (and fruit) plentifully and widely varied, many seasonally.


Monday, October 19, 2015

Back to Basics: How to Make Ghee

"Ghee is a class of clarified butter that originated in ancient India and is commonly used in South Asian cuisines, traditional medicine, and religious rituals." -Wikipedia

In today's world there are a lot of people who cannot tolerate dairy, myself included. One of the good things about ghee is that, when it is prepared correctly, the milk proteins are removed. This means that many people who cannot tolerate butter can tolerate ghee. Basically, it is the best of both worlds: the benefits (and taste!) of butter without the casein and proteins that you may react to.

You can find ghee in the store:
... but I suggest you make it yourself if you have lactose intolerance as I have found that it is very easy and a lot more of the milk proteins seem to be removed when I make it myself than when I purchase it at the store. The exception to this would have to be Tin Star Food's ghee. I have heard awesome things about their ghee from people who do not tolerate dairy well. This isn't to say that other brands' ghee isn't great, I just haven't tried it so I don't want to speak to it. The brand of ghee you see above ended up making me decide to stop being lazy and make some ghee at home again. That's good for you guys though because you can now see how I make it!

INGREDIENTS: 
  • butter (grass-fed butter is a little more difficult to find but is the best due to the higher quality... more vitamins for one!)

EQUIPMENT:
  • small pot
  • cheesecloth
  • glass container for storing ghee

PROCEDURE:
1. Place butter in sauce pan over low heat. I couldn't find grass-fed unsalted butter so I am using a salted variation.

2. Check on butter regularly over the next 2-3 hours, stirring as necessary. It does take a long time to make but you don't have to stand over it the whole time. I often put it on and then go clean my house or do homework, checking on it about every 20-30 minutes. 

3. When you see the milk solids have settled to the bottom and begun to brown so your liquid butter has become golden in color it is time to remove it from the heat. When it gets close to this point though I suggest you stick close to your pot to make sure you only slightly brown the solids verses burning them. I should have left this batch on the stove for a few more minutes so that the milk solids would brown a bit more but I was running behind. It still came out beautifully though.

4. Strain the liquid through cheesecloth into a non-plastic container (I have melted a plastic one before... oh the mess!). The milk solids will remain in the cheesecloth while your ghee will strain through the mesh to the container beneath.

5. Place your ghee in a container. If it has been prepared properly you won't need to refrigerate it and it will last for months!

The unrefrigerated ghee is on the left but if you do store it in the fridge it will look like you see on the right.


One thing to understand about ghee is that the flavor is more intense than the butter you started with. I would suggest adding a little at a time to your dish when first learning to cook with ghee for this reason. Another, awesome, thing to know is that the smoke point is incredibly high so it is great for high heat cooking like sautes and stir fries! I have heard it said that 'you flavor with it like butter but cook with it like oil' and I find that to be fairly accurate but I tend to use less ghee than butter when flavoring with it due to my personal preferences on taste.

Friday, August 7, 2015

Pineapple Upside Down Cake

As I already discussed in a previous post, I am just starting out on my Paleo baking journey but I love cooking and baking so I am always trying out new recipes and variations. Here is a variation of the apple spice cake that actually turned out quite different in the end as a pineapple upside down cake. Again, I understand that a lot of people who eat a Paleo diet abstain from butter and other dairy products, but I do not. I stick to a high fat, low carb real-food inspired Primal/Paleo/Ancestral style of eating that allows for quality dairy. If you don't do well with dairy then you can go back to coconut oil in equal amounts as the butter and the consistency will work just fine.
INGREDIENTS:
1/2 tsp nutmeg
1 tsp cinnamon, plus some for dusting if desired
1/4 tsp baking soda
1/4 tsp sea salt
1/2 C Almond flour
1/4 C Coconut flour
2 Tbsp Arrowroot powder 
1/2 C raw honey, divided
1/4 C real maple syrup
2 tsp lemon juice
4 large eggs
1/4 C melted butter
1/4 C unsweetened applesauce
4-6 slices of pineapple, plus 1/2 C crushed for topping if desired

PROCEDURE:
1. Core and slice your pineapple if you did not purchase it sliced. I used the Pineapple Corer I reviewed here.


2. Juice about half a lemon (again, I was making more in the photo than necessary as I was planning on using it for additional recipes... work smarter and not harder right?).


3. Pre-heat oven to 350 degrees Fahrenheit.

4. Mix all dry ingredients other than baking soda in a bowl.
5. Mix all other ingredients except the pineapples and syrup in a second bowl. You will only use half of the honey (1/2 C) at this time.
 

6. Pour the wet ingredients into the dry ingredients bowl slowly while combining. Mix until smooth and well combined.
*When I took the photos I added the spices after combining but realized this was unnecessary... so there is slight discrepancy here but it gives you an idea of the consistency. (I made both the apple cake and the pineapple cake on the same evening to take in to work for a treat so they have many of the same photos.)
7. Slightly oil the baking pan you are using. You can use butter, coconut oil, etc.
8.  Mix remaining syrup and honey together and spread in the bottom of the pan.

9. Place your pineapple into the bottom of the pan. I don't like cherries particularly well so did not use them but feel free to do so... or get creative in the design of your pineapple pieces even! I love cooking because it is creative and fun... have fun!

10. Bake in the oven for about 5-8 minutes.
11. Remove from oven and pour batter over the pineapple, smooth and return to the oven to bake for another 15-20 minutes. Depending on the dimensions of your pan you may need to adjust the cook time. Thicker cakes will take longer to cook through. The cake needs to be browned on the top and firm throughout or it will be too moist to eat as a cake once it cools.
12. Allow the cake to cool before removing and flipping the cake to make the pineapples right side up. 

I had a bit of a kitchen mishap when I flipped mine and it did not look very pretty as a result (people who are klutzy should not attempt to flip cakes, just sayin'... next time I'll take a photo of how it looks completed. Happy baking!

Tuesday, August 4, 2015

Apple Spice Cake

I'm not a huge bread/pasta/pastry eater anymore even when they are Paleo compliant. When I first started eating Paleo I tried out a lot of bread recipes and never really found anything that I just loved. That, plus the fact that I like easy in my normal day-to-day life since it's a little hectic most of the time led me to sticking with mostly meat and veggies 90% of the time... but sometimes you just need a cupcake. So I've been experimenting with Paleo baking again... it's a lot harder than normal baking. I'm actually fairly good at baking with wheat and sugar (my French bread gets rave reviews whenever I make it) but since I don't eat either wheat or processed white sugar now I need to learn a whole new science of how everything reacts (texture, rise, density) and learn how new flavors work with each other under heat. Nut flours, coconut flour, arrowroot powder, tapioca flour, honey, maple syrup, new oils... they just react differently that anything I am used to baking with so it will likely take some time but I like a challenge. I have a great respect for anyone who can rock an awesome wheat and white sugar free baking recipe but I'm not quite there yet. All that being said, I have a few sweet treat recipes that I'll be sharing over the next couple of days. They may not be perfect yet so if you have suggestions please leave a comment... I'm ALWAYS learning and LOVE cooking up a batch of goodies to share with my coworkers or friends.

When I made these I used coconut oil as the main baking oil but I realized that I wasn't a huge fan of how they turned out so I have adjusted the recipes to sub some of the coconut oil for butter... real, grass-fed butter... not margarine. I understand that a lot of people who eat a more Paleo diet abstain from butter and other dairy products but I do not. I stick to a high fat, low carb real-food inspired Primal/Paleo/Ancestral style of eating that allows for quality dairy. Just throwing that out there... if you don't do well with dairy then you can go back to coconut oil in equal amounts as the butter and the consistency will still work just fine.

INGREDIENTS:
2 tsp ground Cinnamon
1/2 tsp All-spice
1 tsp ground Nutmeg
1/4 tsp baking soda
1/4 tsp sea salt
1/2 C Almond flour
1/4 C Coconut flour
2 Tbsp Arrowroot powder 
1/4 C raw honey
2 tsp lemon juice
4 large eggs
1/4 C melted butter
1/4 C unsweetened applesauce
1 Granny Smith apple, skinned and diced

PROCEDURE:
1.Peel and chop your apples. I skinned the apples with a potato peeler and then just quickly diced them up... I did two apples and had about one whole one left so one large apple should be enough (I wanted some apples in a salad for lunch).


2. Juice about half a lemon (again, I was making more in the photo than necessary as I was planning on using it for additional recipes... work smarter and not harder right?).

3. Pre-heat oven to 350 degrees Fahrenheit.
4. Mix all dry ingredients other than baking soda in a bowl.
5. Mix all other ingredients except the apples in a second bowl.


6. Pour the wet ingredients into the dry ingredients bowl slowly while combining. Mix until smooth and well combined.
*When I took the photos I added the spices after combining but realized this was unnecessary... so there is slight discrepancy here but it gives you an idea of the consistency.
7. Once combined well mix in the apples.
8. Oil the baking pan you are using. You can use butter, coconut oil, etc.

9. Pour the batter into the pan and smooth top. You can sprinkle some additional apples and cinnamon on top if you would like.

10. Bake for 15-20 minutes. Remove when the center is firm and allow to cool before cutting.

Sunday, July 26, 2015

Creamy Italian Dressing

I love ranch dressing... we established that already... but the longer I have been Paleo the less I have used the creamy dressings and other condiments in my day to day life. I still love salad dressings though and a quick vinaigrette is always tasty. This recipe is easily changed to highlight different flavors by exchanging vinegars, oils or herbs but this is a basic Italian inspired version. It isn't completely necessary to use the immersion blender but I really enjoy the slightly emulsified version that results when an immersion blender is used instead of just shaking it up. The longer the dressing sits the stronger the flavors will get. This means that if you don't really like garlic or another spice lessen it at the beginning and don't over-do spices as you experiment with new flavors. 

INGREDIENTS:
1 C vinegar (apple cider, wine, rice, etc... I prefer white as it is closer to a classic bottled Italian dressing as it is a fairly mild vinegar)
1.5 C olive oil or other oil (I use EVOO- extra virgin olive oil)
3 Tbsp water
Tbsp garlic powder
Tbsp onion powder
1/2 Tbsp honey
Tbsp dried oregano
1 tsp ground black pepper
1/2 
tsp dried thyme
tsp dried basil
Tbsp dried parsley
Tbsp salt

PROCEDURE:
1. Put all ingredients in a mixing bowl.

2. Use immersion/stick blender to combine the ingredients. Mix for about a minute.

3. Pour into airtight containers.


*You might have to shake the bottle before using it again to recombine as it can settle.

What kind of vinaigrette dressings do you use in your home?

Saturday, July 25, 2015

Buffalo Ranch Dressing


There are some things I miss more than others with this new way of eating... one of those things is a good ranch dressing on a spinach and mixed greens salad. I tried for months to find a recipe I enjoyed but never found one that was exactly what I was looking for. Don't get me wrong, a quick google search of "Paleo Ranch dressing" will net you several good recipes for ranch but I enjoy quite a bit of dill and a nice bit of garlic in my ranch dressings and none quite hit the spot. This one started out as a combination of several of those googled recipes actually but my ex-husband really likes spicy food and I was working to not only feed myself healthy food but find things that he enjoyed eating as well... so this buffalo ranch recipe was born. It was just spicy enough that he didn't care that it was 'healthy' and made his salads a bit more palatable so we were both eating better. Now its just me around the house so I don't make it as often as I used to but I have taken this dressing to pot lucks where no one but myself was eating Paleo and everyone had rave reviews.

INGREDIENTS:
1 C Paleo Mayo (recipe here)
1 C Coconut Milk
1/3-1/2 C Buffalo Sauce (with no added sugar or unpronounceable ingredients)
1.5 Tbsp Garlic Powder
1.5 Tbsp Onion Powder
2 Tbsp Dill Weed
1 tsp Black Pepper
1/2-1 tsp Sea Salt (to taste)
1 tsp Paprika 

PROCEDURE:
1. Arrange your ingredients and tools. I was cooking several things the day I made this recipe and apparently I decided that I should put extra spices in the picture... sorry about that!

2. Mix the mayo and coconut milk together in a bowl.

3. Add the spices and mix well.
4. Slowly add in the Buffalo Sauce. I put this in last so that I can add more to taste as sometimes I am really craving something spicy. In that case I want more buffalo sauce so I taste as I go to make sure to get the perfect blend of what my taste buds are craving. 

  • NOTE: If you use canned coconut milk the dressing will turn out slightly sweet compared to the refrigerated kind. For this reason I typically use the refrigerated, unsweetened unflavored coconut milk. Today I was out so I turned to my pantry as I always have a jar or two in my pantry staples. 

5. Pour the dressing into jars with airtight seals and refrigerate.

If you lacto-ferment it then it will last about 2 weeks in the fridge. If you do not then it tends to last about a week. It is also really easy to scale up or down this recipe depending on how much you wish to make.

What is your favorite Paleo-friendly dressing?

Friday, July 24, 2015

Paleo Mayo

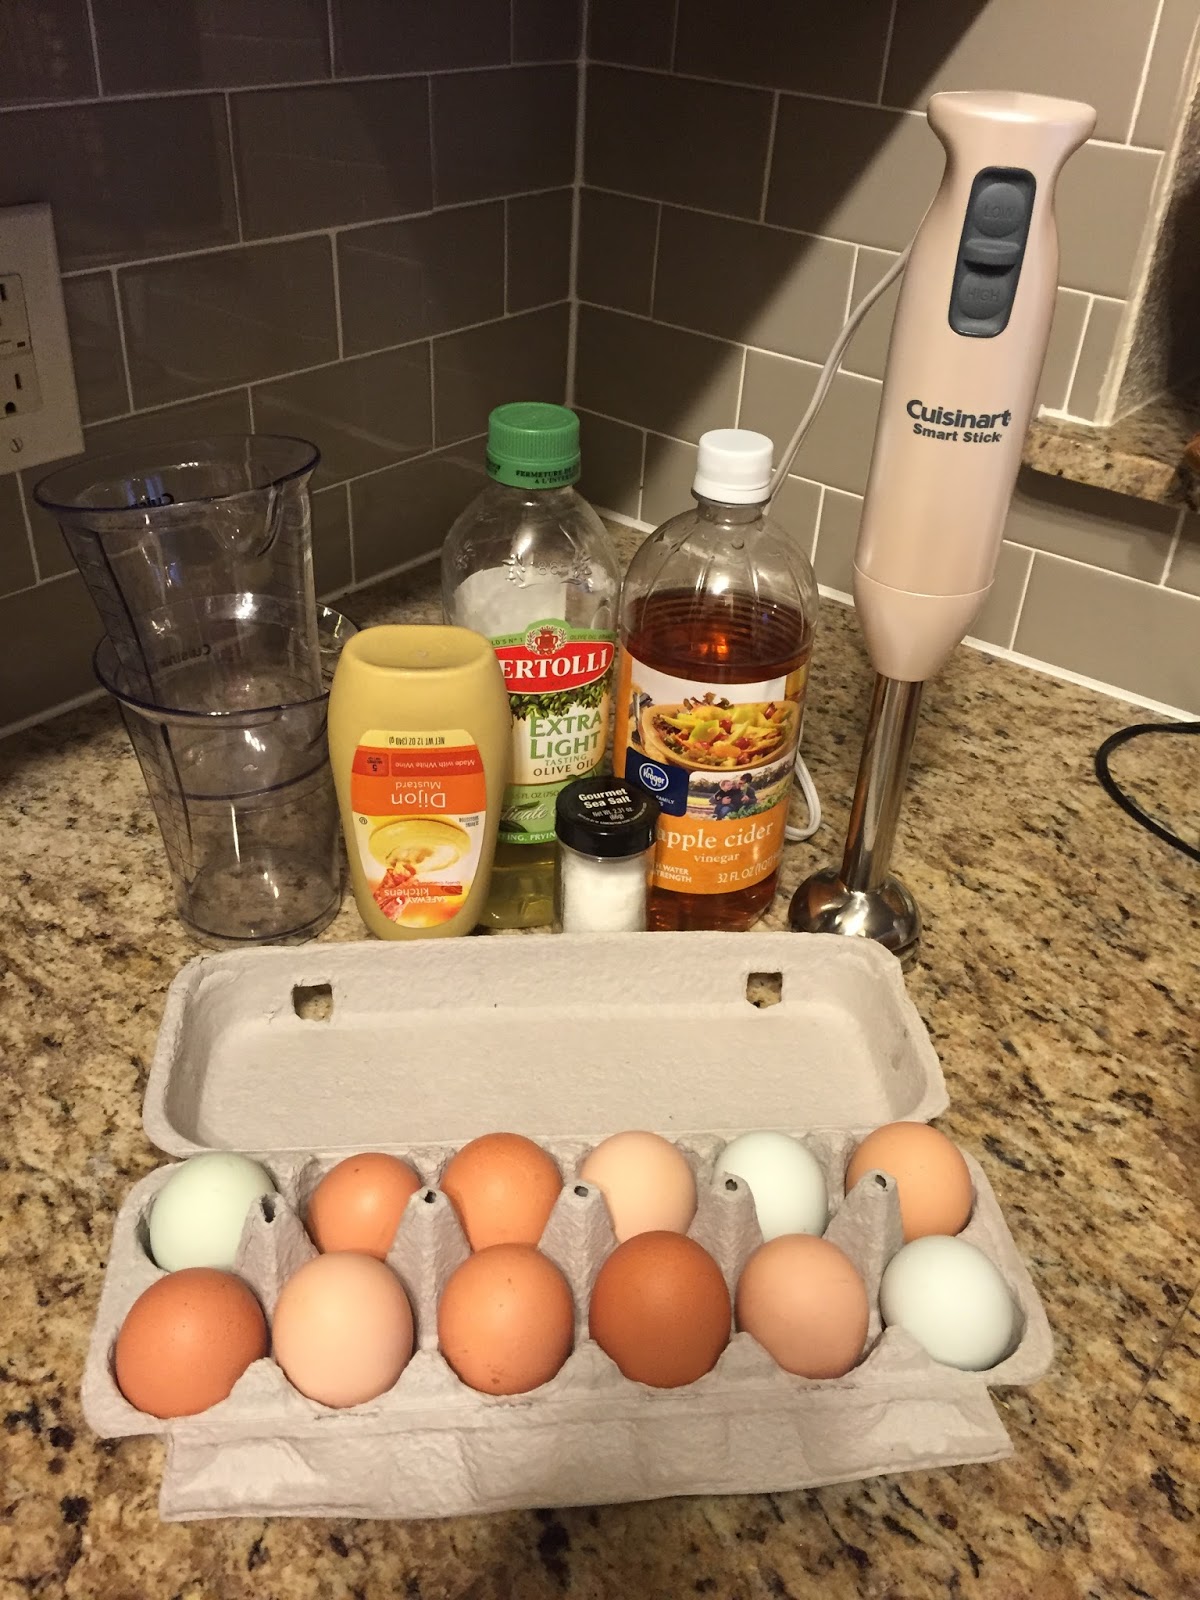
Mayo is a pretty simple and quick condiment to make with the right tools. I have heard of people doing this by hand (ow...) as well as in food processors and with mixers. It seems the best way to make mayo is with an immersion blender and the second best way is with a food processor from what I have heard from others who have attempted this, and similar, recipes. Using an immersion, or stick, blender I have yet to have a batch fail to come out properly but the key is in the super slow drizzle of the oil.

Let's start with the basics of mayo making... you need eggs, an acid, an oil, a bit of salt, mustard, and possibly spices. Some people use egg whites with lemon juice and olive oil while others use apple cider vinegar with whole eggs and avocado oil... it all depends on what flavor you want to come out with in the end. If I want an aioli for instance I am going to use the lemon juice option and toss in some garlic at the end. On the other hand, if I want a good herb mayo spread I'm going to go with the apple cider vinegar and stick with a less flavorful mustard so that the flavors of the herbs I add really stand out. 

Not only are there many different combinations to make mayo but it is a pretty useful thing to have. It can be used as a spread, in casseroles, in tuna (or egg) salad, in dips and other appetizers, in sauces, as the base of creamy salad dressings... you'll be surprised how many uses for mayo there are when you start looking! My basic mayo recipe is as follows:

INGREDIENTS:
1 C Extra Light Tasting Olive Oil (not EVOO)
1 Large or E-Large Egg (the ones I used were local pasture raised and not large enough so I used two eggs and did 1.5x all the other ingredients to compensate... I use WHOLE eggs for my recipe, not just the whites.)
1 Tbsp Apple Cider Vinegar
1 Tbsp Dijon Mustard (I prefer Dusseldorf mustard but they didn't have any at the market... sad day...)
Salt to taste

PROCEDURE:
1. Mix everything except the oil together in a bowl.
*It is best to use eggs that are at room temperature as they tend to emulsify better I have found.


2. Use the immersion/stick blender to whip up the mixture as you SLOWLY drizzle in the olive oil. The key here is slow and steady.


3. Put the mayo into an airtight container and refrigerate.

If you lacto-ferment it then it will last about 2 weeks in the fridge. If you do not then it tends to last about a week. It is also really easy to scale up or down this recipe depending on how much you wish to make. If you don't know how to lacto-ferment your condiments it is a really simple process that I will cover in a few days... so come back and check it out!

What do you use mayo in? What additional spices do you add to it to give it that extra kick of awesome (I've heard of a spicy mayo that sound pretty amazing)?

Wednesday, July 22, 2015

Bone Broths

Bone broth is one of the easiest, most versatile and healthy recipes in the Paleo arsenal. It has a plethora of minerals and proteins that your body needs to run optimally and it tastes great too! As I have joint issues it is very important for me to get a lot of gelatin (and other joint supporting nutrition) into my diet so I LOVE using bone broth in my dishes. Personally, I use it as the base of many of my soups but it can also be used to de-glaze pans when making sauces, roast or saute vegetables, add flavor to a variety of main and side dishes or even drink it alone if you are so inclined. My recipes for bone broth is both super simple and works in the crock pot... which means that I do next to no work to get this fabulous broth! I don't often go through enough meat in any one month to have enough bones using only my leftover ones unfortunately but lucky for me there is an Asian market about 10 minutes away that stocks bones by the pound so I can make bone broth whenever I run out. 

A tip for freezing: freeze it in ice trays or other shallow dishes for easy thawing later. I have found that ice trays are perfect as they are pre-measured and small enough to thaw single serving portions fast but I can always grab my bag of broth cubes and make stew quickly as well. 

Here's the recipe:

INGREDIENTS:
2 lbs of bones (for this example I am using chicken bones acquired from the Asian market)
1-2 celery stalks, rough chopped
2-3 carrots, peeled and rough chopped
1 onions, rough chopped
1-2 Tbsp vinegar (I'm using apple cider vinegar in this example)
garlic cloves to taste
herbs to taste
filtered water

PROCEDURE:
1. Chop the veg and garlic and place in the bottom of the crock pot.
I have an adverse reaction when I chop celery (instant migraine) so I purchase my celery pre-chopped but this isn't necessary nor necessarily optimal. I didn't have access to organic whole carrots today at the store so I used organic peeled baby carrots in about the same amount as 2-3 large carrots.

2. Add the chicken bones to the crock pot.

3. Fill the crock pot the rest of the way with water.


4. Add vinegar.

5. Place top on crock and turn the crock pot on low temperature.

6. Walk away for 24-36 hours.

7. Strain the broth through a fine mesh to remove veg and bones.

8. Cool the broth.

9. Remove layer of fat that solidifies on top of the, now gelled, broth if using non-grass fed/pastured animal bones.

10. Measure out the broth as desired. You can typically keep it in the fridge for about 5 days or freeze part of it if you won't be using it all right away.
Your broth may vary in color from batch to batch depending on the bones you are using, the amount of remaining flesh, whether you roast your bones before using them for broth (good for beef bones especially), and the additional ingredients you add such as veg and herbs. Beef broth, pictured in cubes above, tends to be darker than chicken or fish for instance.

Curious where I get my ingredients? I get my ingredients all over the metroplex, on Amazon and through Young Living as a distributor. Don't want to search out stores to pick them up? I'll make it easy! You can place an order through me for any oils you may need and here are some quick links for the non-perishable ingredients and tools on Amazon should you wish to order online:

Blog Refresh/New Location

Hey guys! I've moved my blog over to Weebly for a restart (everything here is already moved over there!) and to expand the possibiliti...