Showing posts with label chicken. Show all posts

Tuesday, October 27, 2015

Basic Roasted Chicken

Roasted chicken can be quite complex but it doesn't have to be. This staple in the kitchen can be completed in about 2.5 hours with minimal hands-on time and makes a wonderful dinner. I made two chickens at once in a roasting pan with about 10 minutes of prep from start to finish and kept it very simple for this recipe (the recipe and instructions below are for one chicken). I wasn't at home when I made the chickens above which means that I didn't have fresh garlic or herbs... so I just used minced garlic, salt and pepper for the seasoning and stuffed the chickens with onion alone. It was a hit even without the herbs and fresh garlic. Also, since I went very simple I didn't need to tie the legs together but if you are going to be using stuffing you might consider doing so. I'm all about simplicity and using what I have available whenever possible so most of my recipes are easily adapted for a wide range of options, this chicken included.

INGREDIENTS:
  • salt, to taste
  • pepper, to taste
  • garlic- either dried minced garlic or fresh, to taste
  • 1 3-5 lbs whole chicken with the giblets and neck removed (if included)
  • 1 stick of butter
  • 1/2 onion, rough chopped
  • fresh herbs of choice, optional

NEEDED:
  • roasting pan
  • small pan/bowl to melt butter
  • basting brush, optional
DIRECTIONS:
1. Preheat oven to 425 degrees Fahrenheit.
2. Chop your onion and garlic (if using fresh).
3. Melt the butter.
4. Stuff herbs and onion into the cavity of the chicken. I tend to save any that does not fit inside to rub on the chicken after I salt and pepper it.
5. If you are using fresh garlic rub it onto the chicken. If not then you will add your dried garlic with the salt and pepper.
6. Sprinkle salt and pepper onto the chicken and place it breast side down into the roasting pan.
7. Baste the chicken with half of the melted butter.
8. Bake the chicken for 15-20 minutes.
9. Reduce the oven's temperature to 350 degrees Fahrenheit.
10. Baste the chicken with the remaining melted butter and continue baking at the reduced temperature for 1.5-2 hours depending on the weight of the chicken. (Do not consume under-cooked chicken. Please check internal temperature of chicken.)
11. Allow the chicken to rest for at least 10 minutes before carving it in order to maintain the moistness of the meat.


Monday, October 12, 2015

Crock Pot Shredded Chicken

Shredded chicken is incredibly versatile. You can toss it in a variety of sauces for instant wrap filling, burritos, spreads, and more... or just eat it plain on a bed of salad greens with a drizzle of your favorite vinaigrette for a quick and healthful salad. I prefer to make my shredded chicken in bulk when I find a good sale and freeze it up in batches for later use. It's simple, quick, and saves time when preparing last minute meals or bulk cooking chicken meals in later weeks. 

INGREDIENTS:
  • chicken breasts, boneless and skinless
  • chicken stock or broth (check the ingredients if you didn't make it yourself)

EQUIPMENT:
  • crock pot
  • electric mixer (if you don't have one you can use two forks)


PROCEDURE:
1. Place chicken in crock pot. 
  • Most people thaw their chicken first as it is safer from a health perspective since you don't have to worry about intermediate temperatures beyond the safe limits. I have been asked previously if the meat really needs to be thawed first, here's my two cents: I have used frozen chicken directly in the crock pot without issue for this recipe and a few others before BUT food safety rules suggest that you thaw the chicken appropriately beforehand to avoid those potentially longer periods at intermediate temperatures... so that is what I do suggest that you do if at all possible. It is better safe than sorry when it comes to the health of your family in my opinion.
2. Add a couple tablespoons of stock/broth per pound of chicken. 
  • You could use a little bit of water in a pinch but I prefer the stock so that the resulting meat will be tasty and packed with flavor.
3. Place crock pot on low for 6-8 hours. Ensure that the chicken has reached the correct temperature/if fully cooked before turning off the crock pot.
4. Allow the chicken to cool for a few minutes before attempting to shred. If you are using the two forks to shred the chicken I suggest that you allow it to cook quite a bit as I have been burned quite a few times trying to rush to get it shredded and off my to-do list... its not worth it.
5. Shred the chicken. My suggestion is to use the electric mixer to shred the chicken by simple putting the mixer in the bowl with the chicken and 'mixing' like you would cake batter. The chicken shreds very quickly with this method and you avoid burned fingers. :)
6. Allow the chicken to cool completely before freezing it into portions appropriate to your family's needs to avoid ice crystals forming in the containers and on the chicken itself. 
 

Monday, September 21, 2015

Crock Pot Salsa Chicken

This recipe is what I call a 'dump' recipe. You literally dump all the ingredients into the crock pot and walk away. It can't get much easier than that. Use this shredded chicken as a topper for a baked potato, a stuffing for enchiladas or tacos, over rice, as a nacho topping, or just by itself as a protein main. Whatever suits you fancy. :)

INGREDIENTS:
1 Jar Salsa (I prefer Medium... just make sure to read the ingredients if you aren't making it yourself)
1-2 C shredded or matchstick carrots
3 lbs Chicken breast meat

PROCEDURE:
  1. Add salsa, carrots and chicken to the crock pot.
  2. Cook 7-8 hours on low or 5-6 on high.
  3. Shred chicken with two forks and allow to cook for a few minutes before serving.
  4. If you eat dairy there are a few options for a creamy and/or creamy shredded chicken option:
    1. Add 8 oz cream cheese into the crock pot for about half an hour after shredding the chicken for a creamier and slightly tangy version of this meal.
    2. Add 1-2 C shredded Cheddar or Monterrey Jack cheese about 15-30 minutes before serving, after shredding.
NOTE: For a more tangy meal option sub salsa verde for the medium salsa I listed. With the cream cheese it is a great enchilada stuffer and always a crowd pleaser!

Sunday, September 20, 2015

Seasoned Baked Chicken... Taco, Cajun, Italian, You Pick!

Once again we look at chicken. This easy recipe has about 5 minutes of hands on time and is ready before I've finished my evening 'chores' making it a go-to meal when I was married. I've had it on salads, as a protein main with steamed or sauteed veggies, and sliced cold in a wrap... it was pretty tasty any way I tried it. Feel free to mix it up and try this with other spice combinations, the recipe listed below uses Taco Seasoning mix but there are other options. See the "Mix It Up" note at the bottom for two alternate versions that I have already tried out myself.

INGREDIENTS:
2 lbs Chicken
Enough taco seasoning to coat the chicken (1/4 C or 1-2 packets of clean taco seasoning or this)

NECESSITIES:
Large bag or deep bowl for coating chicken
Baking Dish

PROCEDURE:
  1. Pre-heat oven to 400 degrees Fahrenheit.
  2. Wash and pat dry your chicken pieces. You can use whatever kind of chicken your family prefers. Since I usually use this on salads I will often use chicken breast for the sake of being easy but that isn't the only cut that this will work with.
  3. Place seasoning, home made or a clean store bough variety,  into the large bag. I usually start with half of my seasoning mixture so that I can add in more later and don't use more than I necessary.
  4. Add chicken pieces in a few at a time and shake the bag to give them a good coat of the seasoning mixture. Remove the chicken and place it in the baking dish. 
  5. Continue this process until all chicken is covered and placed in the baking dish.
  6. Bake chicken until the juices run clear when cut. If you are using chicken breasts it usually takes 20-30 minutes but the time can vary depending on what cut of chicken you are using, if it is bone in/out, and etc.
  7. Let chicken rest for a few minutes then serve. My favorite way to serve this is on a salad so I will slice up the chicken and add it to a big salad with lots of varied greens and veggies.
MIX IT UP: You can do this with a Tbsp of almond meal and Italian seasoning as well. Just add a little melted butter or ghee drizzled over the top for a delicious pairing with zucchini pasta or other Italian inspired meal!

Want a Cajun version of this? Just sub the taco seasoning for cajun spice mix and you've got the beginnings of one of the tastiest ceasar salads I have ever had. Yumm!

The possibilities are endless! :D

Wednesday, September 2, 2015

Easy Roasted Chicken- 2 Ways

Sorry I've been MIA guys... it has been a little bit crazy in my personal life this past week with a new doctor, an MRI, grad school starting up again and some other personal issues so I wasn't able to get a lot of blogging work completed unfortunately. Never fear, I am not gone from the net-verse! I have a list of posts that I am working on currently including a review of one of my favorite running apps (I can't run but I love it for my walks!) plus I ordered the backpack that I was talking about in my previous post. It should get here this week so that review will be upcoming as well- I'm so excited! Then it's a couple of recipes and a post about how I organize my household chores for quick completion throughout the week. I completely re-did my chart to show you guys how I came up with my personal plan from start to finish so that you can design your own that works for your family! For today though I am talking about two recipes for roasted chicken that are very simple to make. Read more below.


This week I decided to stick with chicken as my main protein as it was on sale and I've had some big expenses lately. I picked up some chicken thighs and drumsticks for a good price and headed home to see what I would come up with once I got in the kitchen. Unfortunately by the time I got home I wasn't feeling very well at all as I had had an MRI earlier in the day and the contrast dye really doesn't get out of system as fast as the doctors say it should- possibly due to the MTHFR but its an unknown and doesn't really matter in the end. The dye makes me sick to my stomach and causes my POTS to act up... I had to wait a while after the MRI before I could leave as I was pretty dizzy actually. So I went with as little time as possible on my feet in the kitchen and had some cuddles with my pups.  Here they are... I love my love-bugs! The one on the left is Roxanne or Roxy and on the right is my Isabel or Izzy. They are both 4 years old turning 5 in January and February of 2016. Roxy just had quite the health scare if you recall- she almost died! She is doing so much better now though, happy as a clam and hyper as all get out. Isabel is a bit more mellow but is crazy about her ball and will bug you for hours on end to throw it again and again... do not forget to pack it if we go visit somewhere or there will be craziness. It's basically her binky... and the only toy she cannot destroy in less than a minute (tennis ball to gravel in 60 seconds people, for serious). I will likely review the toy maker at some point since I have quite a few of their toys if anyone is interested.

For the chicken thighs I drizzled a little ghee and 2 cloves of rough chopped garlic (you could use melted butter if you prefer), did a quick massage to get everything coated well then sprinkled on some sea salt and fresh cracked black pepper and popped it in the oven. If you want it with a little kick add some paprika... yumm!

For the drumsticks I went with a citrus taste. I simply squeezed two lemons and a lime on top of the drumsticks and added the same salt and pepper as on the thighs. There are so many options for this with marinades including zest, spices and etc that I will be going back and experimenting with this combination again in the future but tonight I just wanted fast but still tasty.


For both of these dishes I set the oven to 300 degrees in order to get a slow roast on the chicken over a couple of hours. Depending on the amount of chicken you have in the oven the cook time could vary but it took about 3 hours for mine to be fully cooked. Make sure to check the internal temperature if you aren't sure if the chicken is fully cooked or not. So far I have enjoyed these dishes as lunches and dinners throughout the week. What other ways do you cook up chicken in your house? :)

Thursday, August 6, 2015

Crock Pot "Rotisserie" Chicken

I love my crock pot. It is easily the most used kitchen gadget I own simply because it makes my life easier and I spend less time standing over a stove when I use it... a big deal for someone like me. What do I mean by that? When I stand my body exerts the same amount effort as when you are moving at a brisk walk or even run depending on the day- it's just a part of having POTS. There are some days where everything is awesome and I can stand for a long time or even exercise but there are others where I need to be sitting, or lying/reclining for the majority of my day. Changing my eating habits and other lifestyle changes have drastically reduced the days where I need to be lying down and even increased the amount of time I can sit, stand and exercise on a daily basis significantly but there are still days when it is impossible for me to do do more than nuke a meal I made last week and froze on a good day... or grab a plate of whatever is in the crock pot. Basically my crock pot has become my best friend and I have adapted quite a few recipes for it to help me out. This one is a newer one to me but I recently added whole chickens to my grocery list because:
  1. They are cheaper than purchasing the individual cuts of meat separately.
  2. I get to keep the bones for yummy bone broth or stock... saving more money
  3. They feed me for several days or longer if I make up frozen portions... bulk cooking, I love it!
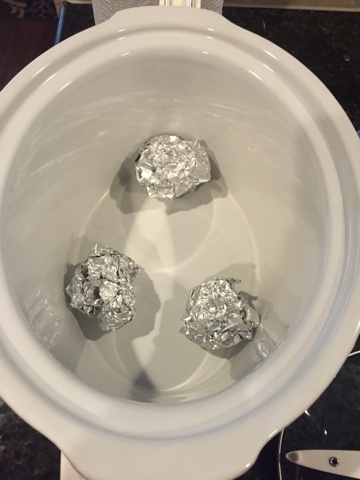
I make chicken in so many ways in the crock pot- Chicken Ragu, enchilada chicken, chicken curries, soups with chicken, shredded chicken (for other recipes like chicken salad, chicken enchilladas, stuffed veggies and 'pasta'... so many things!)... there are endless possibilities! The only problem is crispness. When you make something in the slow cooker the moisture does not evaporate very much. This is great for stews, stocks, and things you want to be moist and tender after hours cooking but not so great for things that you want to end up crispy. Using foil balls under the chicken will keep it from sitting in the juices that come out during cooking and negate some of this issue to give you a more authentic rotisserie chicken experience with so much less work.

If you want to toss some carrots, sweet potato and onions in the bottom of the crock amongst the foil balls you can make this a one-pot meal. I would make sure the vegetables you use aren't ones that are delicate or they won't hold up as well in the crock pot and you will loose the texture. Greens are an example of something I would not put in the crock pot all day- put them about 15-20 minutes before serving and they will absorb some of the flavors of the rest of the dish and be wilted nicely but still retain their texture and color.

INGREDIENTS:
  • whole chicken, 4-5 pounds (insides removed)
  • 2 tsp salt
  • 1 tsp ground black pepper
  • 1/2 tsp garlic powder
  • 1/2 tsp onion powder
  • 1/2 tsp Italian spices (Basically this is just equal parts basil, marjoram, oregano, rosemary, sage, thyme, and parsley if you want to make your own instead of purchasing a pre-made bottle at the store)
  • 1 Tbsp paprika (smoked has the best flavor)
  • dash of dry mustard, optional
  • dash of cayenne, optional
  • any veggies you want, optional
TOOLS:
  • slow cooker with crock large enough to hold your chicken
  • aluminum foil
  • bowl for mixing spices

PROCEDURE:
1. Mix the spices together in a bowl.

2. Rinse the chicken and pat dry.

3. Rub spice mixture all over your chicken. You want to get the outside as well as the inside (and, if you want to, on the chicken breasts under the skin... it feels odd but you will get some super flavorful chicken out of it!).
4. Roll up some foil balls and place them in the bottom of your crock pot.


5. Toss any veggies you have decided to add to the pot, if any, into the bottom of the crock pot. If you are using a small crock pot you may not have room depending on the size of your chicken- I have a large 6 qt. crock pot.

6. Place chicken atop the foil balls and cover with lid.


7. Cook on low for 6-8 hours. If you need it sooner you can cook it for 4-5 hours on high but make sure that the chicken is cooked through before you remove it. A meat thermometer should measure the internal temperature at 160 F or greater.


8. Carefully remove the chicken from the crock pot. It will be very tender and may even fall apart when you remove it... if you are big on meal presentation then take this into account. 
NOTE: If you want a crispy skin you can finish the chicken in the broiler for a few minutes once you remove it from crock pot.


9. Let the chicken sit for a few minutes before cutting or removing it from the bones if you are doing so (and save the bones to make bone broth in the freezer!). Bon appetit!


Wednesday, July 22, 2015

Bone Broths

Bone broth is one of the easiest, most versatile and healthy recipes in the Paleo arsenal. It has a plethora of minerals and proteins that your body needs to run optimally and it tastes great too! As I have joint issues it is very important for me to get a lot of gelatin (and other joint supporting nutrition) into my diet so I LOVE using bone broth in my dishes. Personally, I use it as the base of many of my soups but it can also be used to de-glaze pans when making sauces, roast or saute vegetables, add flavor to a variety of main and side dishes or even drink it alone if you are so inclined. My recipes for bone broth is both super simple and works in the crock pot... which means that I do next to no work to get this fabulous broth! I don't often go through enough meat in any one month to have enough bones using only my leftover ones unfortunately but lucky for me there is an Asian market about 10 minutes away that stocks bones by the pound so I can make bone broth whenever I run out. 

A tip for freezing: freeze it in ice trays or other shallow dishes for easy thawing later. I have found that ice trays are perfect as they are pre-measured and small enough to thaw single serving portions fast but I can always grab my bag of broth cubes and make stew quickly as well. 

Here's the recipe:

INGREDIENTS:
2 lbs of bones (for this example I am using chicken bones acquired from the Asian market)
1-2 celery stalks, rough chopped
2-3 carrots, peeled and rough chopped
1 onions, rough chopped
1-2 Tbsp vinegar (I'm using apple cider vinegar in this example)
garlic cloves to taste
herbs to taste
filtered water

PROCEDURE:
1. Chop the veg and garlic and place in the bottom of the crock pot.
I have an adverse reaction when I chop celery (instant migraine) so I purchase my celery pre-chopped but this isn't necessary nor necessarily optimal. I didn't have access to organic whole carrots today at the store so I used organic peeled baby carrots in about the same amount as 2-3 large carrots.

2. Add the chicken bones to the crock pot.

3. Fill the crock pot the rest of the way with water.


4. Add vinegar.

5. Place top on crock and turn the crock pot on low temperature.

6. Walk away for 24-36 hours.

7. Strain the broth through a fine mesh to remove veg and bones.

8. Cool the broth.

9. Remove layer of fat that solidifies on top of the, now gelled, broth if using non-grass fed/pastured animal bones.

10. Measure out the broth as desired. You can typically keep it in the fridge for about 5 days or freeze part of it if you won't be using it all right away.
Your broth may vary in color from batch to batch depending on the bones you are using, the amount of remaining flesh, whether you roast your bones before using them for broth (good for beef bones especially), and the additional ingredients you add such as veg and herbs. Beef broth, pictured in cubes above, tends to be darker than chicken or fish for instance.

Curious where I get my ingredients? I get my ingredients all over the metroplex, on Amazon and through Young Living as a distributor. Don't want to search out stores to pick them up? I'll make it easy! You can place an order through me for any oils you may need and here are some quick links for the non-perishable ingredients and tools on Amazon should you wish to order online:

Blog Refresh/New Location

Hey guys! I've moved my blog over to Weebly for a restart (everything here is already moved over there!) and to expand the possibiliti...